Recruit
Set up your parade application
Open the form editor, edit each section and its questions, add your own fields, preview, and publish. Plus how to charge a fee.
The application is how groups sign up to be in your parade. Setting it up happens in two places: you edit the form's questions under Pages, and if you're charging, you set fees under Settings. This tutorial covers the decisions first, because those are what people get stuck on, then walks through the editor in detail.
Decide what to ask
Every question you add is a question every applicant has to answer, so ask for what you will actually use.
Most parades need:
- Who the group is, and a contact person
- What kind of entry it is (float, walking group, vehicle, band)
- Rough size, so you can plan spacing
- Anything you need for safety or lineup
Leave off anything you can collect later. A shorter form gets finished more often.
Open the form editor
- Open the parade and go to Pages.
- In the Forms section, find the Application Form and click the pencil.
That opens the form editor: the whole application laid out the way an applicant sees it, but with editing controls added. Along the top you get a Back to Pages link and a Preview Form button. The form is built from sections, in order: Contact Information, Unit Details, Vehicles & Trailers, Additional Information, Insurance, and an optional Custom Section at the end.
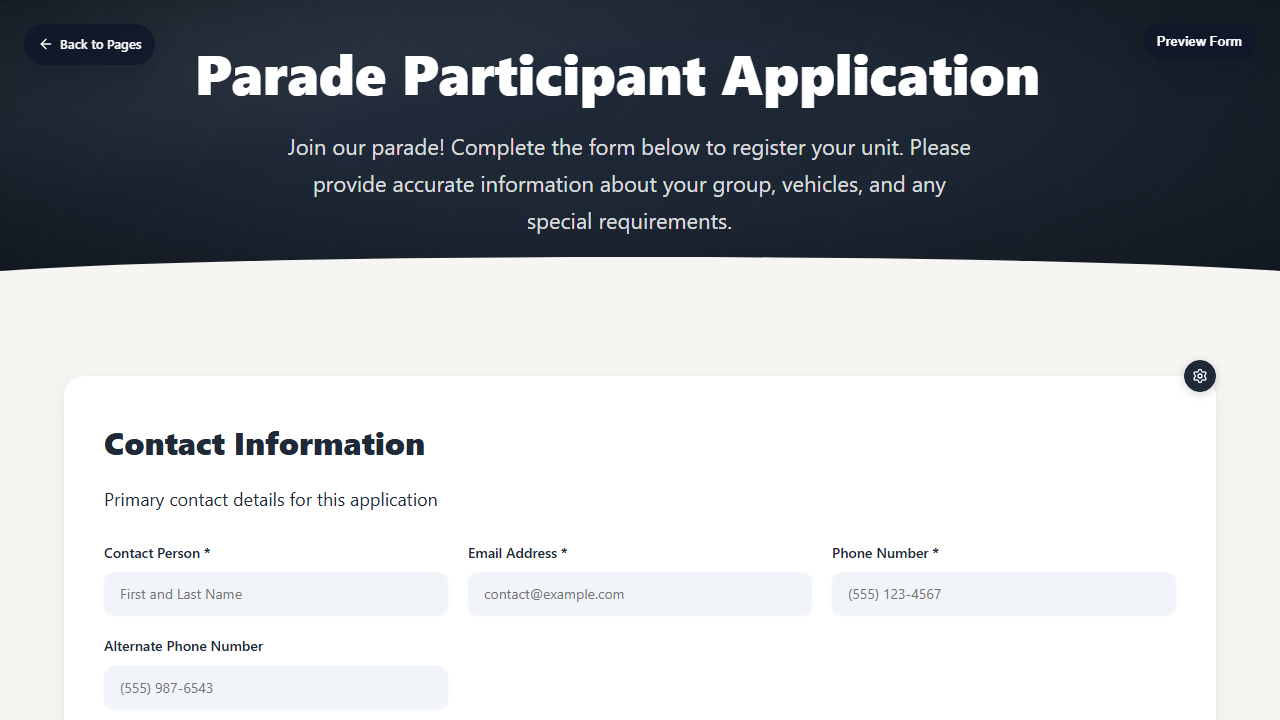
The editor works on the real form, so what you see is what applicants get. One thing looks different: applicants first meet a Parade Rules & Regulations screen they have to read and accept before any questions appear. The editor skips that gate so you can work, but keep it in mind when you preview.
The rules text itself isn't edited on this page. It comes from a document called Participant Rules and Regulations in the Documents tab (Documentation Sheets). Open that sheet to change what applicants have to accept. It supports merge fields, so details like your parade's name and date fill in on their own. See Generate parade-day paperwork for how the document editor works.
Two ways to edit: text and settings
There are two kinds of controls, and it helps to know which is which.
- The pencil (✎) edits words. Any heading or description with a small pencil next to it is editable. Click it, a box opens, change the text, and save. This is how you reword the form's title, the intro under it, and each section's heading and lead line. You can use line breaks in the longer ones.
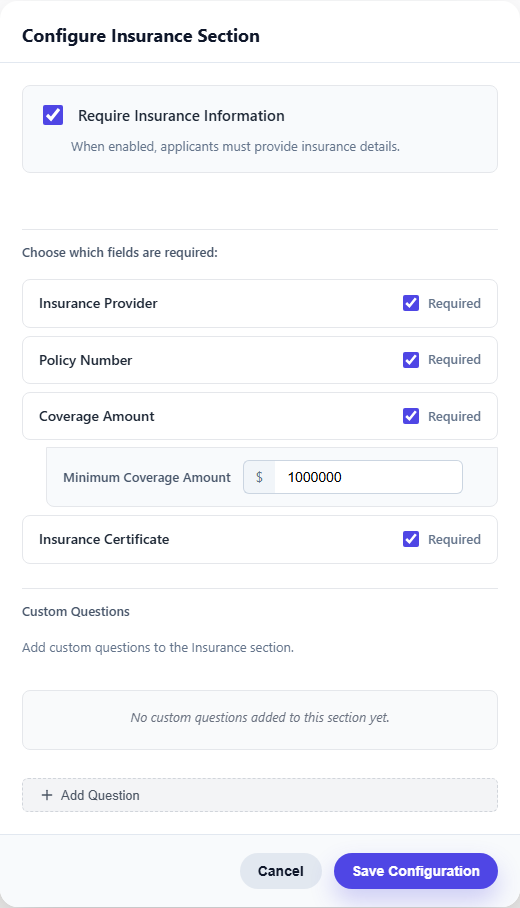
- The gear edits behavior. Each section has a settings gear in its top corner. That opens the section's settings: which built-in fields show, whether the section is on at all, and the section's custom questions. This is where the real structure lives.
Everything saves as you go. Each box saves to the server the moment you save it, so there is no separate Save button for the form as a whole, and nothing is lost if you leave. The flip side is there is no undo, so deletes are real once you confirm them.
What each section holds
Some fields are built in and always part of an application. You can't remove the essentials, but most sections let you turn optional fields on or off, and every section lets you add your own questions. Open a section's gear to see its options.
Contact Information. Contact name, email, and phone are always required and can't be switched off. There's a built-in alternate phone too. Beyond that, you can only add custom questions here.
Unit Details. This holds the group's name, website, a group image, a description, participant counts, and the unit category. In settings you can:
- Show or hide the Announcer Summary (the short blurb read aloud as the unit passes the stand).
- Show or hide Participants in Vehicles. If you hide it, it counts as 0.
- The list of unit categories isn't set here. It's managed in Parade Settings › Unit Types.
Vehicles & Trailers. The whole section can be turned off, which is the right move for a walking-only parade. When it's on you can set:
- A maximum length for any single vehicle or trailer, and a maximum total length per entry. Leave either blank for no limit.
- Collect proof of insurance for each vehicle, which asks applicants to attach a document for every vehicle they add.
Applicants add each vehicle through an Add Vehicle or Trailer box that asks for type, make and model, year, and length. Length is required, because it drives lineup spacing.
Additional Information. This is where safety details live. In settings you can show or hide the Loud Music and Animals questions, show or hide the Special Needs and Anything else text boxes, and add Quick Checkboxes, which are simple yes/no boxes you type one per line (for example, "Requires police escort"). Checking the Animals box reveals follow-up fields for animal counts, handlers, and cleanup.
Insurance. The whole section can be turned off. When it's on, you decide which of the four fields (Provider, Policy Number, Coverage Amount, Certificate) are required, and you set a minimum coverage amount for the coverage field. The default minimum is $1,000,000.
Custom Section. Off by default. Turn it on to add a section of your own at the very end of the form, holding only the custom questions you write.
Add and edit your own questions
Custom questions are how you ask anything the built-in fields don't cover. They live inside a section, so you add them from that section's gear.
- Open a section's settings gear.
- Under Custom Questions, click Add Question (or the pencil on an existing one to edit it).
- Fill in the question and save.
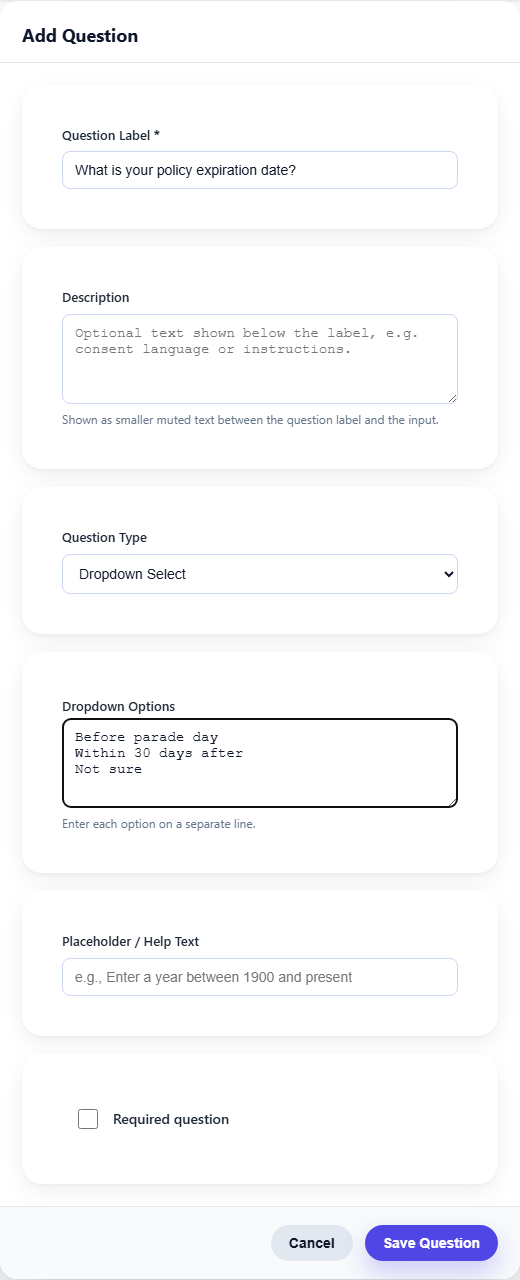
A question has these parts:
- Label: the question itself. Required.
- Description: an optional line of helper text shown under the label.
- Type: how they answer (see below).
- Placeholder: faint example text inside the box before they type.
- Required: whether they must answer it to submit.
The type controls the answer:
- Short Text: a single line.
- Long Text: a multi-line box for longer answers.
- Number: numbers only.
- Dropdown: they pick one from a menu you fill in. Type the choices one per line.
- Checkbox: give it choices (one per line) and they get a box for each and can check several. With no choices it becomes a single yes/no box.
- Multiple Choice: a set of choices where they pick exactly one. Needs at least one choice.
For dropdown, checkbox, and multiple choice, a choices box appears where you type one option per line.
To reorder questions, drag the handle (☰) on the left of each one. To move a question to a different section, edit it and change its Section. To remove one, click the trash icon and confirm. A delete takes effect right away and there's no undo, so if you remove one by mistake you'll need to add it back.
Preview and publish
Editing changes the form, but it doesn't make it public. Two separate things:
- Preview. Click Preview Form in the editor toolbar. It opens the live public form in a new tab, exactly as applicants see it, rules gate and all. This is the honest way to check your work.
- Publish. Go back to the Pages list and use the Draft / Published toggle on the Application Form. It stays a draft, invisible to the public, until you switch it to Published.
Once published, your application link lives at /p/your-org/your-parade/apply. Share that link, or point to it from your public website so people can find it on their own.
Test your own form once before you share it. Preview it, then submit a practice entry as if you were an applicant, and delete it afterward. It's the quickest way to catch a confusing question.
Decide whether to charge a fee
Fees are optional and separate from the questions. If your parade is free to enter, you can skip this section entirely.
To turn fees on, go to Settings, open the Payments tab, and enable Application Payments. A Configure button appears once the toggle is on; click it to open the Application Fee dialog and choose a pricing mode:
- By organization type. Applicants pick their organization type on the form (non-profit, business, school, and so on), and the fee for that type applies automatically. This mode needs your organization types set up first, under Settings, on the Structure tab, in Organization Types. Every type must have a price before the dialog will save.
- Tiered pricing. You define price tiers right in the dialog (add them, drag to reorder) and applicants choose one on the form. Payment is collected after you approve their entry, not at submission.
Decide how you review entries
Applications arrive in one place for you to accept or decline. Decide up front who reviews them and how quickly you'll respond, so groups aren't left waiting. A short, clear turnaround does more for your reputation than any single form field.
Questions that come up
Where's the Save button? There isn't one for the form as a whole. Each box saves the moment you save it. Closing the editor loses nothing.
Can I undo a deleted question? No. Deletes are immediate. Add the question back if you removed it by mistake.
Why does my published form show rules before the questions? Applicants must read and accept your parade rules first. The editor hides that gate so you can work, but the live form and the preview both show it. To change the wording, edit the Participant Rules and Regulations document in the Documents tab.
Can I remove the name, email, or contact fields? No. A handful of core fields are part of every application. You can add to the form and toggle the optional fields, but the essentials stay.
Where do the unit categories come from? From Parade Settings › Unit Types, not the form editor. Edit them there and the form picks up the change.
My changes aren't public. Editing and publishing are separate. Flip the Draft / Published toggle on the Application Form back on the Pages list.